| Главная » Статьи » ПАРАПЛАНЕРИЗМ » СТАТЬИ И ИНСТРУКЦИИ |
GoFly - Flying Computer ProjectGoFly is a new project based on Mio Moov s501 PNA car gps, LK8000 tactical fligh computer software and variometer (altimeter) external input.Why? - you can build this for about 150$ -really nice flying computer, with lot of features, -builtin variometer, -built in data logger approved by FAI -with color screen, TOPO maps and airspace maps -easily support competition tasks -your PNA is still very good car navigation system, so it will be peace of cake to come back from XC flying, If You have to parawait, there is plenty of other apps, games that You can find on the Internet for PNA. How it is work? - this is not my idea, lot of glider pilots is using palmtops, pna-devices for couple of years with dedicated flying software. LK8000 is one of the best, made by pilots for pilots, and if you have idea how to improve this software, they really like to listen. So, the idea is to find cheap, nice looking PNA device, with good lcd screen, that we can see even in direct sunlight, unclock it, put LK8000 software on it, build small vario device with serial output and connect everything together. Also, project contain battery upgrade and sound vario.  What we need? 1. Mio Moov s501, s401 or Mio M400 car navigation system. You can find those devices on ebay for around 35-70$ (You can also use other pna, but remember, we need good lcd screen and serial TTL 3.3v input). Mio is already tested by many glider pilots. :Link:  2. Unlocking software (this software will let you enable hidden Windows CE environment. Unlock is based on http://projects.lanik.org/GPSProject_00.htm and http://www.glidertools.com/) DOWNLOAD MS501_LK8000_UNLOCK 28.07.2011v DOWNLOAD BETA TEST M400_LK8000_UNLOCK.07.2011v This Mio unlock version is prepared for Mio S501 (with Navman map folder) This Mio unlock contain LK8000 v2.2e, S-E part of USA maps, paragliders polars and USA airspace maps. There is also device manager to quick check under which serial port GPS unit works, mp3 player to play some music during parawaiting, desktop rotating app for LK8000 and much more, like games and apps, that You can access through files explorer (extra apps and games are not part of the unlock software). LK8000 and all necessary files for unlock software are installed on build in memory (not SD card). You can put extra programs, and mp3 files to SD card. Anytime You can upgrade LK8000 just overwriting LK8000 folder or just overwrite upgraded files, but always keep your profile and setting files to avoid setting up LK8000 again from the beginning. This unlock is tested only on Mio S501. I don't know how this unlock will work on others Mios. There are small differences between different Mio models (folders structure, backlight control, etc.) so I AM NOT RESPONSIBLE if you'll brick your mio. At Mio support website I found recovery software (SmartST_S501_v6_10_0056.exe) for my Mio S501 to bring Mio device to manufacture state (software recovers all folders content). Because I was playing a lot with files, I had to recover my mio few times before I finished Unlock software. It is good to have this recovery software and backup You entire data from Mio memory before You attemt to do some changes. Of course You need also Mio user application to recover Your maps. But I swapped to much better working software from "I GO" brand. How to install: Preparing: 1. Backup Your entire memory content from Your mio to Your harddrive. If something will go wrong, You can always recover mio system drive do original state. One important file during unlock is changed so after unlock if You do not have backup there will be only hard way to recover Your Mio to manufacture state. The most important thing is to have usb connectivity. I've never lost usb, but I've read that some folks bricked mio forever. Installing: 2. Connect Mio using usb to Your computer. Restart Mio. You should get usb connectivity and removable media should show up on Your computer. 3. Download and Unpack S501_LK8000_UNLOCK software to Your computer 4. Copy all folders to Your Mio S501 memory, During copy process some files have to be overwritten. All files must be copy direct to the root of mio memory. 5. Turn off the device into the reset position, wait a few seconds and then switch on again (Hard Reset) 6. After 10-30 seconds You should get new nice looking mio desktop :) 7. USB connection works only if You connect Mio to usb cable first and do hard reset. If You are familiar with folders, settings files, some scripting, I think after few short nights ;) You should be able to move this unlock software to any m,s-series mio... Good luck. 3. 4x AA rechargeable batteries, but You have to combine those batteries with special battery holder or project box with 4xAA battery compartment  USB/DC Lithium Polymer battery charger 5-12V - 3.7/4.2v cells from http://www.adafruit.com/products/280  with nice huge Lithium Ion Battery Pack - 3.7V 6600mAh http://www.adafruit.com/products/353  http://www.adafruit.com/products/248  4. Arduino Pro 328 3.3v/8Mhz development board from Sparkfun.com. It has 3.3v regulator so You can use input voltage from 3.7v to 12v (if You are good in electronics, try Arduino Pro mini version)  5. Barometric Pressure Sensor - BMP085 Breakout Board from Sparkfun.com  6. miniUSB angle cable It is really hard to find mini usb cable with angle plug and all 5 pins populated with wires, but You can find one here https://www.argentdata.com/catalog/product_info.php?products_id=111 7. miniUSB <>serial adapter from Sparkfun.com (you have to cut 5v jumper on the back of board and solder 3.3v jumper)  8. Plastic project enclosure (box)  How to build this project?      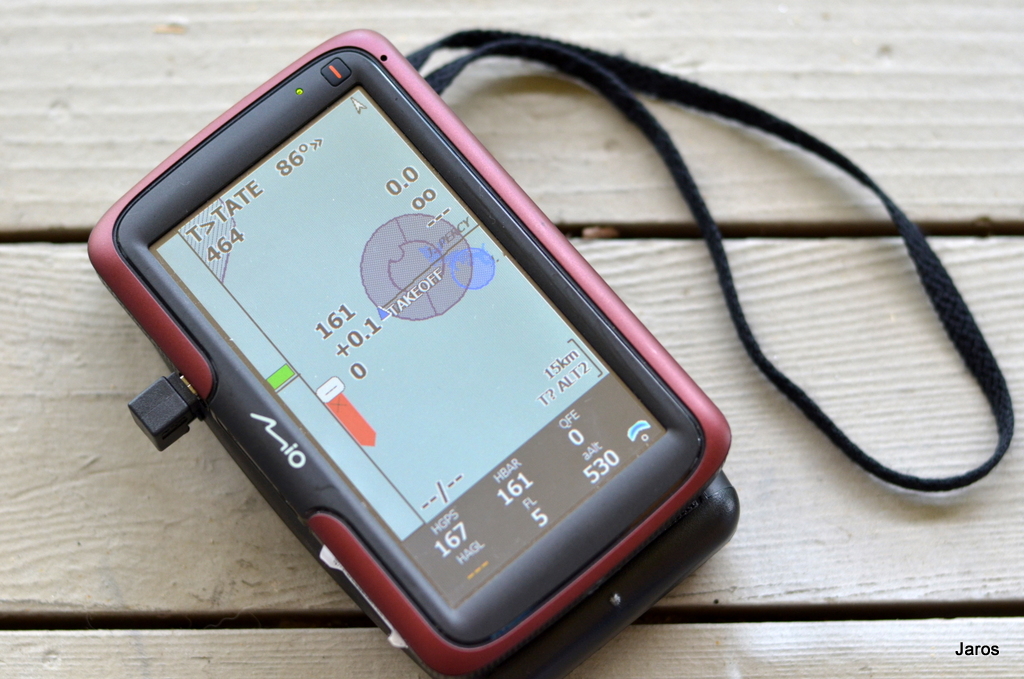 How to setup programming environment? You can find everything on this page http://arduino.cc/en/Guide/Windows Program listing. I did some programming long time ago (over 10 years ago) so this program is not perfect. Based on what I found on the internet, some learning, trying and references websites. #include <Wire.h> // i2c library#include<stdlib.h> // we need it to convert float to string (vario output)#define BMP085_ADDRESS 0x77 // I2C address of BMP085const float p0 = 101325; // Pressure at sea level (Pa)float altitude;int OSS = 2; //oversampling setting 0-low power,1-standard,2-high res.,3-ultra high res.int battery = 999; //we dont have battery sensor, output is 999 for no battery in LK8000 vario input protocolint ac1;int ac2; int ac3; unsigned int ac4;unsigned int ac5;unsigned int ac6;int b1; int b2;int mb;int mc;int md;long b5; short temperature;long average_pressure;long pressure; // few buffers for averaging pressure levellong pressure1;long pressure2;long pressure3;long pressure4;long pressure5;char bmp085Read(unsigned char address) // reading function{ unsigned char data; Wire.beginTransmission(BMP085_ADDRESS); Wire.send(address); Wire.endTransmission(); Wire.requestFrom(BMP085_ADDRESS, 1); while(!Wire.available()); return Wire.receive();}int bmp085ReadInt(unsigned char address){ unsigned char msb, lsb; Wire.beginTransmission(BMP085_ADDRESS); Wire.send(address); Wire.endTransmission(); Wire.requestFrom(BMP085_ADDRESS, 2); while(Wire.available()<2); msb = Wire.receive(); lsb = Wire.receive(); return (int) msb<<8 | lsb;}void setup() // setting serial output parameters{ Serial.begin(9600); Wire.begin(); bmp085Calibration();}// Stores all of the bmp085's calibration values into global variables// Calibration values are required to calculate temp and pressure// This function should be called at the beginning of the programvoid bmp085Calibration(){ ac1 = bmp085ReadInt(0xAA); ac2 = bmp085ReadInt(0xAC); ac3 = bmp085ReadInt(0xAE); ac4 = bmp085ReadInt(0xB0); ac5 = bmp085ReadInt(0xB2); ac6 = bmp085ReadInt(0xB4); b1 = bmp085ReadInt(0xB6); b2 = bmp085ReadInt(0xB8); mb = bmp085ReadInt(0xBA); mc = bmp085ReadInt(0xBC); md = bmp085ReadInt(0xBE);} // reading uncompensated temperature valueunsigned int bmp085ReadUT(){ unsigned int ut; // Write 0x2E into Register 0xF4 // This requests a temperature reading Wire.beginTransmission(BMP085_ADDRESS); Wire.send(0xF4); Wire.send(0x2E); Wire.endTransmission(); // Wait at least 4.5ms delay(5); // Read two bytes from registers 0xF6 and 0xF7 ut = bmp085ReadInt(0xF6); return ut;} // reading uncompensated pressure valueunsigned long bmp085ReadUP(){ unsigned char msb, lsb, xlsb; unsigned long up = 0; // Write 0x34+(OSS<<6) into register 0xF4 // Request a pressure reading w/ oversampling setting Wire.beginTransmission(BMP085_ADDRESS); Wire.send(0xF4); Wire.send(0x34 + (OSS<<6)); Wire.endTransmission(); // Wait for conversion, delay time dependent on OSS delay(10 + (3<<OSS)); Wire.beginTransmission(BMP085_ADDRESS); Wire.send(0xF6); Wire.endTransmission(); Wire.requestFrom(BMP085_ADDRESS, 3); // Wait for data to become available while(Wire.available() < 3) ; msb = Wire.receive(); lsb = Wire.receive(); xlsb = Wire.receive(); up = (((unsigned long) msb << 16) | ((unsigned long) lsb << 8) | (unsigned long) xlsb) >> (8-OSS); return up;}short bmp085GetTemperature(unsigned int ut) //calculating temperature from BMP085 in C{ long x1, x2; x1 = (((long)ut - (long)ac6)*(long)ac5) >> 15; x2 = ((long)mc << 11)/(x1 + md); b5 = x1 + x2; return (((b5 + 8)>>4)/10); }long bmp085GetPressure(unsigned long up) //calculating pressure from BMP085 in Pa{ long x1, x2, x3, b3, b6, p; unsigned long b4, b7; b6 = b5 - 4000; // Calculate B3 x1 = (b2 * (b6 * b6)>>12)>>11; x2 = (ac2 * b6)>>11; x3 = x1 + x2; b3 = (((((long)ac1)*4 + x3)<<OSS) + 2)>>2; // Calculate B4 x1 = (ac3 * b6)>>13; x2 = (b1 * ((b6 * b6)>>12))>>16; x3 = ((x1 + x2) + 2)>>2; b4 = (ac4 * (unsigned long)(x3 + 32768))>>15; b7 = ((unsigned long)(up - b3) * (50000>>OSS)); if (b7 < 0x80000000) p = (b7<<1)/b4; else p = (b7/b4)<<1; x1 = (p>>8) * (p>>8); x1 = (x1 * 3038)>>16; x2 = (-7357 * p)>>16; p += (x1 + x2 + 3791)>>4; return p;}float vario; void loop() // looper, everything is happening here{ temperature = bmp085GetTemperature(bmp085ReadUT()); //temperature in celsius pressure = bmp085GetPressure(bmp085ReadUP()); //pressure in pascals pressure5=pressure4; pressure4=pressure3; pressure3=pressure2; pressure2=pressure1; pressure1=pressure; average_pressure = (pressure+pressure1+pressure2+pressure3+pressure4+pressure5)/6; //vario in centimeters float altitude_backup = altitude; altitude = (float)44330 * (1 - pow(((float) average_pressure/p0), 0.190295)); // altitude in meters vario=(altitude-altitude_backup)*100+10; char vario_arr[5]; char altitude_arr[5]; //wee need this array to translate float to string //combine everything to create data string output String str_out = String("LK8EX1"+String(",")+String(average_pressure,DEC)+ String(",")+String(dtostrf(altitude,0,0,altitude_arr))+String(",")+ String(dtostrf(vario,0,0,vario_arr))+String(",")+String(temperature,DEC)+String(",")+String(battery,DEC)+String(",")); // Calculating checksum for data string int ai; int bi; int checksum_end; for (checksum_end = 0, ai = 0; ai < str_out.length(); ai++) { bi = (unsigned char)str_out[ai]; checksum_end ^= bi; } //make some beep // noTone(9); int Beep =0; int HowLongBeep = 0; if ((vario > 10 ) && (vario < 2000)) { // map vario output to beep note, if vario low, note is low and long, if vario high, note is high and short Beep = map(vario, 10, 2000, 1000, 3000); //mapping vario output 0-9999 to Beep note 100-5000 HowLongBeep = map(vario,10, 2000, 150, 30); //mapping vario output 0-9999 to note duration 200-10ms } else if (vario >= 2000) { Beep = 3000; HowLongBeep=50; } else if (vario < -100) { Beep = 250; HowLongBeep = 10; //delay(100); } // play the beeeep tone(9, Beep, HowLongBeep); // send beep to pin 9, play "Beep" tone for "HowLongBeep" time delay(100); //creating now NMEA serial output for LK8000, LK8EX1 protocol format //$LK8EX1,pressure,altitude,vario,temperature,battery,*checksum Serial.print("$"); //print first sign of NMEA protocol Serial.print(str_out); // print data string Serial.print("*"); //end of protocol string Serial.println(checksum_end,HEX); //print calculated checksum on the end of the string in HEX }How to set up LK8000? Setting up serial ports This part is taken from LK8000 website.
Источник: https://sites.google.com/site/jarosrwebsite/para-nav | |||||||||||||||||||
| Просмотров: 7138 | Теги: | Рейтинг: 5.0/1 | |||||||||||||||||||

| Всего комментариев: 0 | |
| Социальные сети |
| Categories | |||
|
| САЙТ ЖИВЕТ |
| ВХОД НА САЙТ |
| СТАТИСТИКА |
Онлайн всего: 2 Гостей: 2 Пользователей: 0 |
| РЕЙТИНГ |
| НОВОЕ НА ФОРУМЕ |
